RoadToChain Logo
RoadToChain
T2/M2.4/Setting up Redis caching in Next.js
beginner 12m read

Setting up Redis caching in Next.js

How to initialize Upstash Redis, set up a Next.js API route to cache slow IPFS requests, and build a resilient fallback handler.

#redis #nextjs #caching #performance #project

When I first attempted to implement the caching proxy in Next.js, I imported the standard TCP redis package, configured my connection pool, and deployed it to Vercel.

Within 30 minutes, our console was flooded with connection timeout errors.

In a serverless environment (like Next.js API routes running on Vercel), each request spins up an isolated, ephemeral function. If you use a traditional TCP connection client, every execution container attempts to open and maintain its own connection pool to the Redis database. Under load, you quickly hit your database's connection limit and crash the server.

To avoid this, modern serverless Web3 apps use HTTP-based Redis clients like Upstash Redis (@upstash/redis). It executes queries over HTTP REST requests, which are stateless, pool-free, and perfectly designed for serverless environments.

Let's implement a production-grade IPFS cache route inside Next.js using Upstash Redis.

Cache Routing Flow in Next.js API Route
A caching resolver intercepts queries, returning cached data instantly on hits, and fetching and storing raw IPFS files on misses to build a self-populating cache.

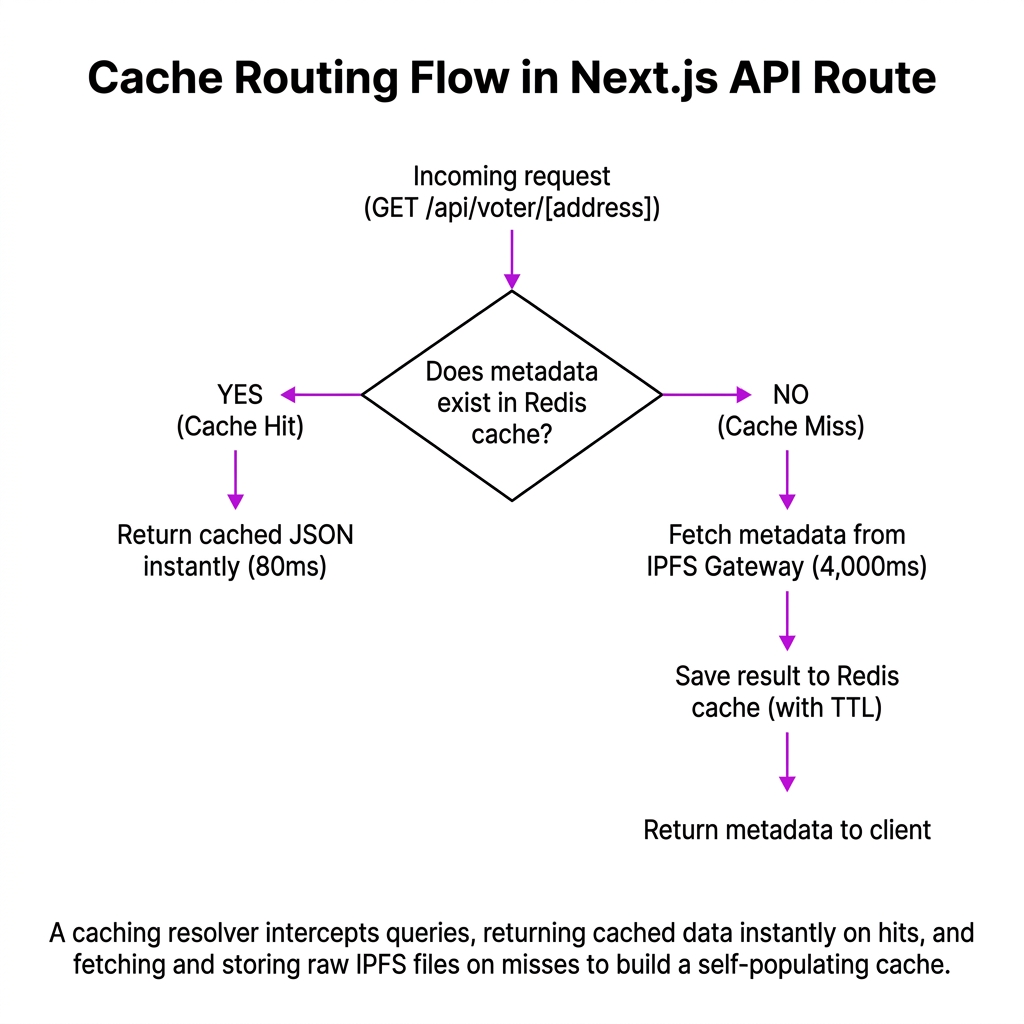
1. Installation and Credentials Setup

First, install the Upstash Redis SDK:

terminal
bash
npm install @upstash/redis

Next, add your credentials to your .env.local file. You can spin up a free Redis database in seconds on Upstash.

your-database-name.upstash.io
env
UPSTASH_REDIS_REST_URL="https://your-database-name.upstash.io"
UPSTASH_REDIS_REST_TOKEN="your_access_token_here"

2. Initializing the Client

Create a utility file to export a single, reusable Redis client instance:

types.ts
typescript
// lib/redis.ts
import { Redis } from "@upstash/redis";
 
// Check if credentials are present
if (!process.env.UPSTASH_REDIS_REST_URL || !process.env.UPSTASH_REDIS_REST_TOKEN) {
  console.warn("⚠️ Upstash Redis environment variables are missing. Caching will be disabled.");
}
 
export const redis = new Redis({
  url: process.env.UPSTASH_REDIS_REST_URL || "",
  token: process.env.UPSTASH_REDIS_REST_TOKEN || "",
});

3. Building the Caching API Route

Now, let's create a Next.js API Route (using Next.js App Router) that acts as a proxy for fetching IPFS metadata:

gateway.pinata.cloud
typescript
// app/api/ipfs/[cid]/route.ts
import { NextRequest, NextResponse } from "next/server";
import { redis } from "@/lib/redis";
 
export async function GET(
  request: NextRequest,
  { params }: { params: { cid: string } }
) {
  const { cid } = params;
  const cacheKey = `ipfs:${cid}`;
 
  try {
    // 1. Attempt to read from Redis cache
    let cachedData = null;
    try {
      cachedData = await redis.get(cacheKey);
    } catch (redisError) {
      // If Redis is down, we print a warning but DON'T fail. 
      // A cache failure should never break our entire application.
      console.error("Redis read error:", redisError);
    }
 
    if (cachedData) {
      console.log(`🚀 Cache HIT for CID: ${cid}`);
      return NextResponse.json(cachedData, {
        headers: { "x-cache": "HIT" },
      });
    }
 
    console.log(`🐌 Cache MISS for CID: ${cid}. Fetching from IPFS Gateway...`);
 
    // 2. Cache MISS: Fetch from Pinata IPFS Gateway
    const gatewayUrl = `https://gateway.pinata.cloud/ipfs/${cid}`;
    const response = await fetch(gatewayUrl, {
      headers: {
        // Expose credentials only server-side
        "x-pinata-gateway-token": process.env.PINATA_GATEWAY_TOKEN || "",
      },
    });
 
    if (!response.ok) {
      throw new Error(`IPFS gateway returned status: ${response.status}`);
    }
 
    const payload = await response.json();
 
    // 3. Attempt to save the payload to Redis (with a 24-hour TTL)
    try {
      // We store the raw JSON directly. Upstash handles serialization for us.
      await redis.set(cacheKey, payload, { ex: 86400 });
    } catch (redisError) {
      console.error("Redis write error:", redisError);
    }
 
    return NextResponse.json(payload, {
      headers: { "x-cache": "MISS" },
    });
 
  } catch (error: any) {
    console.error("Error in IPFS proxy handler:", error);
    
    // Fallback: If both Redis and Pinata fail, return a public gateway redirect link
    return NextResponse.json(
      { 
        error: "Failed to load IPFS metadata", 
        fallbackUrl: `https://ipfs.io/ipfs/${cid}` 
      }, 
      { status: 502 }
    );
  }
}

// I Got This Wrong

The Silent Fallback Mistake: When I first added caching, a Redis connection error threw an unhandled exception, causing our entire IPFS proxy API route to return a 500 status code. The frontend couldn't load any voter profile images because the cache server had a brief network hiccup. Always wrap your Redis operations in an independent try-catch block! A cache is an optimization, not a hard requirement. If the cache is down, fall back directly to IPFS.

— Postmortem Confession

System Design Challenge
Think Active

Notice that our route returns an x-cache response header (with values "HIT" or "MISS"). Open your browser dev tools, inspect the network panel, and make multiple requests to your newly created API endpoint. Verify that the first request shows x-cache: MISS (and takes > 1 second), and subsequent requests return x-cache: HIT in under 50ms.

[ Think Before Continuing ]

Was this lesson helpful?

Let us know what you think of this specification. (submitting anonymously)